















Software Update Center
The PTI Genius Plus and the PTI NEO run the same GYS LEGEND S2 system software. Get the latest update file, then follow the USB installation procedure for your machine.
Latest Software Version
One update file covers both the PTI Genius Plus and the PTI NEO. Enter the serial number from your machine's data plate on the GYS update page and it downloads the correct .egf system update file, which is copied directly onto a USB stick before installation.
Locate the USB Port
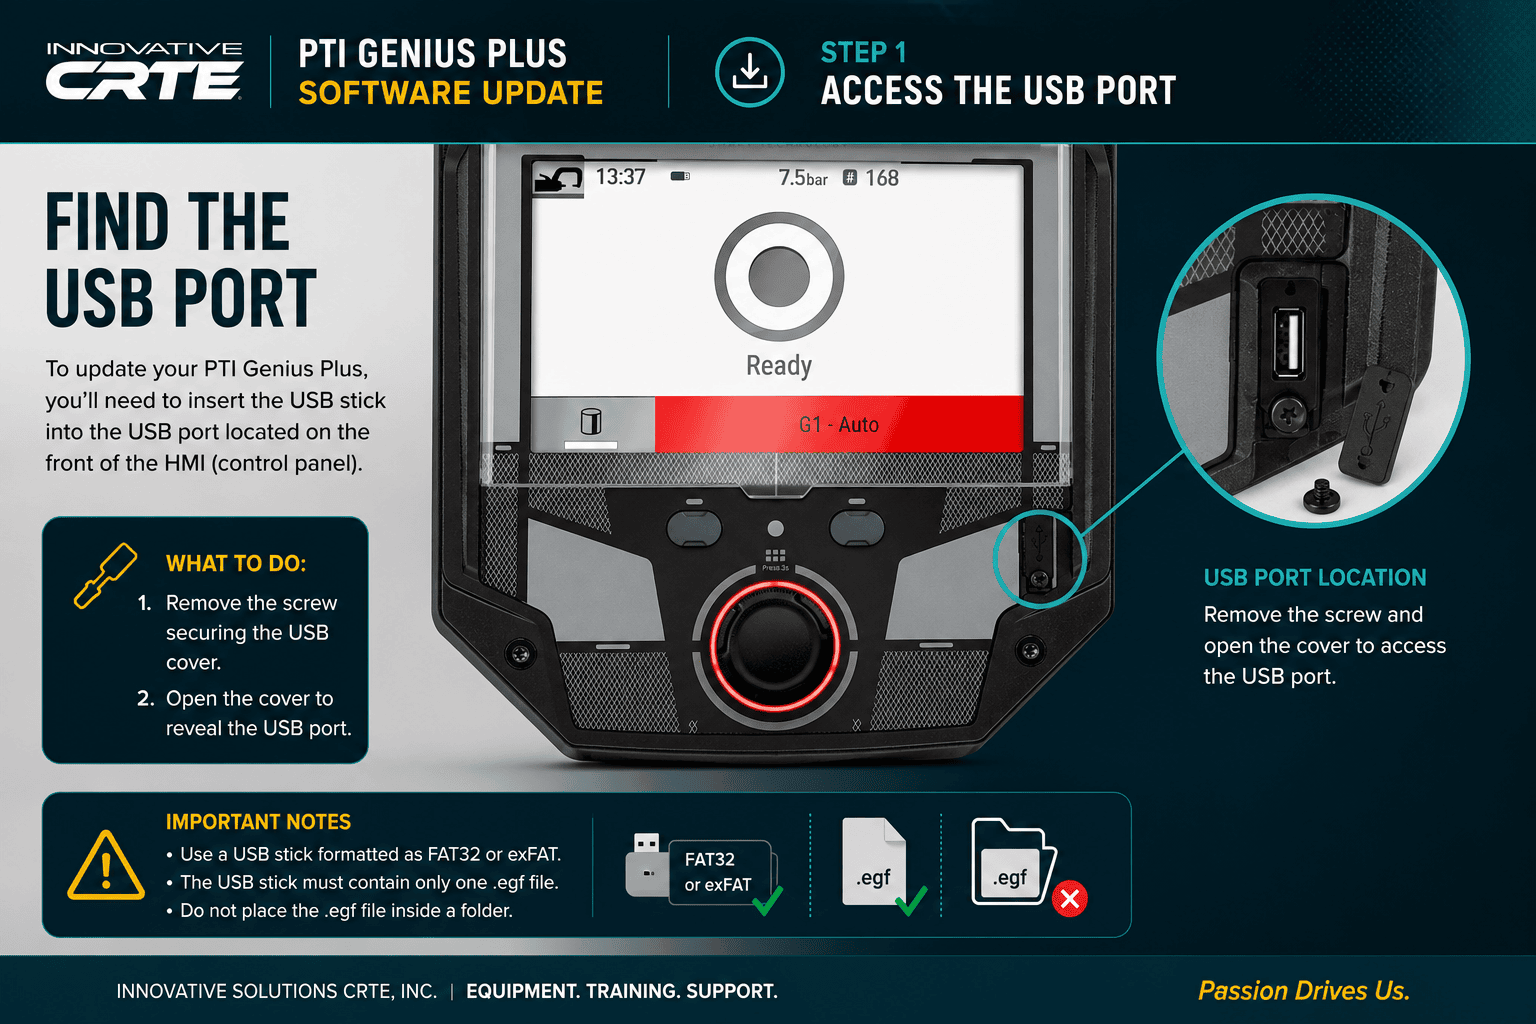
The USB port sits behind a small cover on the front of the HMI control panel. Remove the screw and open the cover to reach the port.
USB Update Procedure
The PTI Genius Plus and the PTI NEO use the same control layout, two buttons and the HMI knob, and the same update procedure.
Need the update file?
Open the GYS update page in a new tab, enter your serial number, and keep these instructions open while preparing the USB stick.
Get the Latest Software Update
The GYS update page opens in a new tab so you can stay here while reviewing the software history and update notes.
PTI Genius Plus and PTI NEO Software History
English summary of the GYS LEGEND S2 system software releases for the GYSPOT PTI Genius Plus 208/240V and PTI NEO. Innovative Solutions CRTE checks for new releases weekly and adds them here.
| Release Date | Software Versions | Update Summary |
|---|---|---|
| 2026-09-28 Current | LEGEND S2.3.10 | Current release for the PTI Genius Plus and PTI NEO. GYS did not publish release notes for this update. |
| 2026-06-24 | Clamp Card V1.25 Power Supply Card V1.21 Control Card V1.35 | Minor improvement. |
| 2026-06-23 | Clamp Card V1.25 Power Supply Card V1.21 Control Card V1.34 | Correction of translations. |
| 2026-06-05 | Clamp Card V1.25 Power Supply Card V1.21 Control Card V1.32 | Increased welding range in single-point gun mode. |
| 2026-05-28 | Clamp Card V1.24 Power Supply Card V1.20 Control Card V1.31 | Correction of Finnish translations. |
| 2026-05-27 | Power Supply Card V1.19 Clamp Card V1.23 Control Card V1.30 | MMI configuration management. |
| 2026-05-07 | Clamp Card V1.22 Power Supply Card V1.18 Control Card V1.29 | Improved welding in gun mode. |
| 2026-04-30 | Clamp Card V1.21 Power Supply Card V1.17 Control Card V1.28 | Added maintenance procedure for force verification. Increased maximum welding thickness to 8.2 mm. Improved text field input handling. Added Danish and Romanian languages. Added display of current caps/electrode. Improved fault management. Minor overall improvements. |
| 2025-12-16 | Power Supply Card V1.16 Clamp Card V1.20 Control Card V1.27 | Minor improvements. |
| 2025-11-20 | Power Supply Card V1.15 Clamp Card V1.19 Control Card V1.25 | Minor welding improvements. Minor display improvements. Added new Honda welding points. Minor global improvements. |
| 2025-09-19 | Clamp Card V1.18 Power Supply Card V1.14 Control Card V1.24 | Minor improvement. |
| 2025-09-16 | Clamp Card V1.17 Power Supply Card V1.14 Control Card V1.24 | Minor aesthetic improvements. General minor enhancements. |
| 2025-09-11 | Power Supply Card V1.14 Clamp Card V1.16 Control Card V1.23 | Minor improvement. |
| 2025-09-10 | Clamp Card V1.16 Power Supply Card V1.14 Control Card V1.22 | Added Korean language support. Network pressure display now uses different colors depending on the pressure level. Added support for maintenance procedure schedules. Minor aesthetic improvements. |
| 2025-08-06 | Clamp Card V1.15 Power Supply Card V1.13 Control Card V1.21 | Added Chinese and Japanese languages to the Genius Plus HMI. Minor improvements to all HMI. |
| 2025-07-31 | Power Supply Card V1.13 Clamp Card V1.15 Control Card V1.21 | Added double-press welding mode. Added an optional power limiter based on the circuit breaker rating. Minor improvements. |
| 2025-07-04 | Clamp Card V1.14 Power Supply Card V1.12 Control Card V1.20 | Improved thermal error management. |
| 2025-07-02 | Clamp Card V1.14 Power Supply Card V1.12 Control Card V1.19 | Support for PTI Genius Plus. Support for new arms G91X1, G91X2, and G91X6. Addition of the draining procedure. Minor improvements. |
| 2025-04-29 | Clamp Card V1.13 Power Supply Card V1.11 Control Card V1.18 | Minor corrections and stability improvements. |
Need Help Updating Your Genius Plus or NEO?
If you are unsure about your machine model, serial number, update file, or USB installation procedure, contact Innovative Solutions CRTE before proceeding.
